

Could the scan meant to protect your website disrupt it instead? The risk depends on what you test and how the scan is configured. If you want to scan website for vulnerabilities before launch, start by defining the authorized scope and choosing a scan depth that fits your site. The most aggressive settings aren’t automatically the right choice.
It’s reasonable to wonder which scanner to use, whether a live site can handle a scan, and what to do with a list of alerts. A scan can surface potential weaknesses, but it can’t prove your site is completely secure. Some findings need validation, and their priority depends on the evidence and potential impact.
This guide explains how to run an authorized, appropriately scoped scan, interpret common results, and decide what to review before launch. The practical workflow is to define the target, choose scan depth, review findings, prioritize next steps, and retest. You can start with a free target check and use plain-language findings to guide your next move.
Key Takeaways
- To scan website for vulnerabilities safely, confirm you’re authorized and define exactly which site or environment is in scope.
- Choose scan depth based on what you need to assess. Public-facing checks may not cover authenticated areas or source code.
- Read severity labels alongside the evidence and likely impact, then validate important findings before deciding what to address.
- Use a five-step workflow: confirm authorization, define scope, choose scan depth, review evidence, and retest.
- Start with BUGSKILLER’s free target check, review the recommended plan, and select a scan depth suited to your website.
Why scan a website for vulnerabilities before it goes live?
Before launch, a site may look finished while its public-facing setup still has weaknesses. A vulnerability scan runs automated checks against a defined target and flags issues those checks can detect. To scan website for vulnerabilities, first confirm that you own the site or have permission to test it, then define which parts are in scope.
Scan before launch and repeat after significant changes. A new plugin, server configuration, or public feature can change what’s exposed. Finding a possible weakness early gives you time to investigate it before users rely on the site.
A vulnerability scan is an automated check of a scoped target that flags detectable weaknesses. Treat the findings as clues to validate, not proof that an attacker can exploit them or that the site is secure.
What can a website vulnerability scan look for?
Depending on the tool, configuration, target, and selected scan depth, checks may flag issues such as:
- Exposed services or open ports that may not need to be publicly reachable.
- Outdated software components that could have known weaknesses.
- Weak TLS settings that affect how connections are protected.
- Missing security headers that help browsers handle web content safely.
These are examples, not a guaranteed checklist. Results depend on what the scan can reach and test. As the Vulnerability scanner overview explains, scanners can use unauthenticated checks or, when configured, authenticated checks with access to more of the target. Neither approach proves exploitability by itself. A flagged issue may need manual validation, and an untested area may still contain a weakness.
When should you scan a website?
Scan before launch, then scan again after significant changes to the public-facing site, such as software updates, server-setting changes, or new visitor-facing features. Keep the scope consistent when comparing results. A baseline records what the scanner detected at a particular point, making new or resolved findings easier to identify later.
Use the results as a prompt to investigate, not as a pass-or-fail certificate. Check whether a finding applies to your setup, assess its likely impact, and decide what needs attention before launch. A clean report describes only the checks run against the target at that time. It doesn’t guarantee that every weakness was found or that the site is completely secure.
How does a website vulnerability scan find potential weaknesses?
A scan starts with a target and a set of checks. Identify the website you own or have explicit permission to test, then configure the scan for the approved scope and access level. The scanner sends requests, observes responses, and compares what it sees with patterns that may indicate a weakness. You then review the findings and the evidence behind each alert.
Scan coverage depends on the target, access provided, and checks enabled. A report reflects only what the scan could reach and assess. An external scan can’t inspect every part of an application, and it won’t review source code unless code analysis is included in a separate process. To scan website for vulnerabilities effectively, match the scan method to the question you need answered.
What is the difference between external and authenticated scanning?
An external scan examines the public-facing parts of a site that an anonymous visitor can access. It can reveal issues in the exposed surface, but won’t see content or functions behind a login. Authenticated checks use approved access to assess areas unavailable to anonymous visitors, such as protected pages or account workflows. Both methods have limits, and neither guarantees that every vulnerability will be found.
Source-code analysis is a separate approach. It examines application code rather than relying only on what the live website reveals. A public scan, an authenticated scan, and code analysis answer different questions, so don’t assume one method covers the others. Keep the scope and access appropriate to the assessment.
What does a scanner report actually show?
Read each finding as evidence to examine, not a verdict. Check four things:
- Issue: What possible weakness did the scanner flag?
- Evidence: What response, configuration, or behavior supports the alert?
- Affected target: Which page, host, or component was involved?
- Suggested priority: How urgently does the scanner recommend reviewing it?
A false positive is an alert that may not represent a real, applicable weakness in your setup. The scanner may lack context, or the evidence may need interpretation. Verify the affected target and reproduce or inspect the reported behavior before deciding what to do. Severity labels can help sort the queue, but use the evidence and likely impact to guide your judgment.
Use the report to direct your investigation, then compare your next steps with practical CISA guidance on website security. It’s a useful reference, not a substitute for checking whether a finding applies to your site. You can also review a website scan at a selected depth and examine its plain-language findings.
Which website scan findings should you trust and prioritize?
A scan gives you findings to investigate, not a ready-made fix list. Severity labels help sort results, but they’re triage signals. Consider each label alongside the evidence, affected feature, and likely impact on your site. A high-severity alert on an unreachable test path may call for a different response than a credible issue affecting a public login or payment flow.
A scanner alert is a reported possibility. It becomes a verified, exploitable vulnerability only when the evidence and real-world conditions support that conclusion. One clean scan doesn’t prove your website is fully secure. The scan may not cover every page, access level, or type of weakness. Treat the report as a snapshot of what the configured checks detected.
| Severity signal | Evidence to review | Likely impact to consider | Recommended validation |
|---|---|---|---|
| Critical or high | Reproducible behavior, affected endpoint, or clear exposure | Could expose sensitive data or affect important functionality | Confirm the affected feature and configuration promptly. Treat credible, high-impact issues as potential launch blockers. |
| Medium | Specific condition with context-dependent evidence | May require particular access, settings, or user interaction | Check whether those conditions apply to your site and assess the affected function. |
| Low or informational | Configuration detail or limited evidence | May indicate a hardening opportunity with limited direct impact | Review against your setup and schedule appropriate follow-up. |
How can you tell whether a scan finding is a false positive?
Start with the affected URL and the exact condition the scanner reports. Compare its evidence with your configuration and component versions, then see whether the condition is still present when you reproduce the test. A result that doesn’t match the site’s setup may be a false positive, but don’t dismiss it based on the label alone. Record uncertain findings and why they need further review.
What should you fix first after a website scan?
Prioritize credible findings with potentially high impact, especially those affecting exposed or sensitive functionality. Then look for related alerts. Several findings may point to one underlying configuration issue, so group them before planning changes. This keeps your response focused and can help you verify whether one correction addresses multiple results.
Separate potential launch blockers from lower-priority hardening tasks. Investigate and address credible risks that could affect users or sensitive data before release. Track lower-impact items for follow-up, then scan again to see whether the findings have changed. If you scan website for vulnerabilities, use the evidence and your site’s context to set priorities, not severity labels alone.
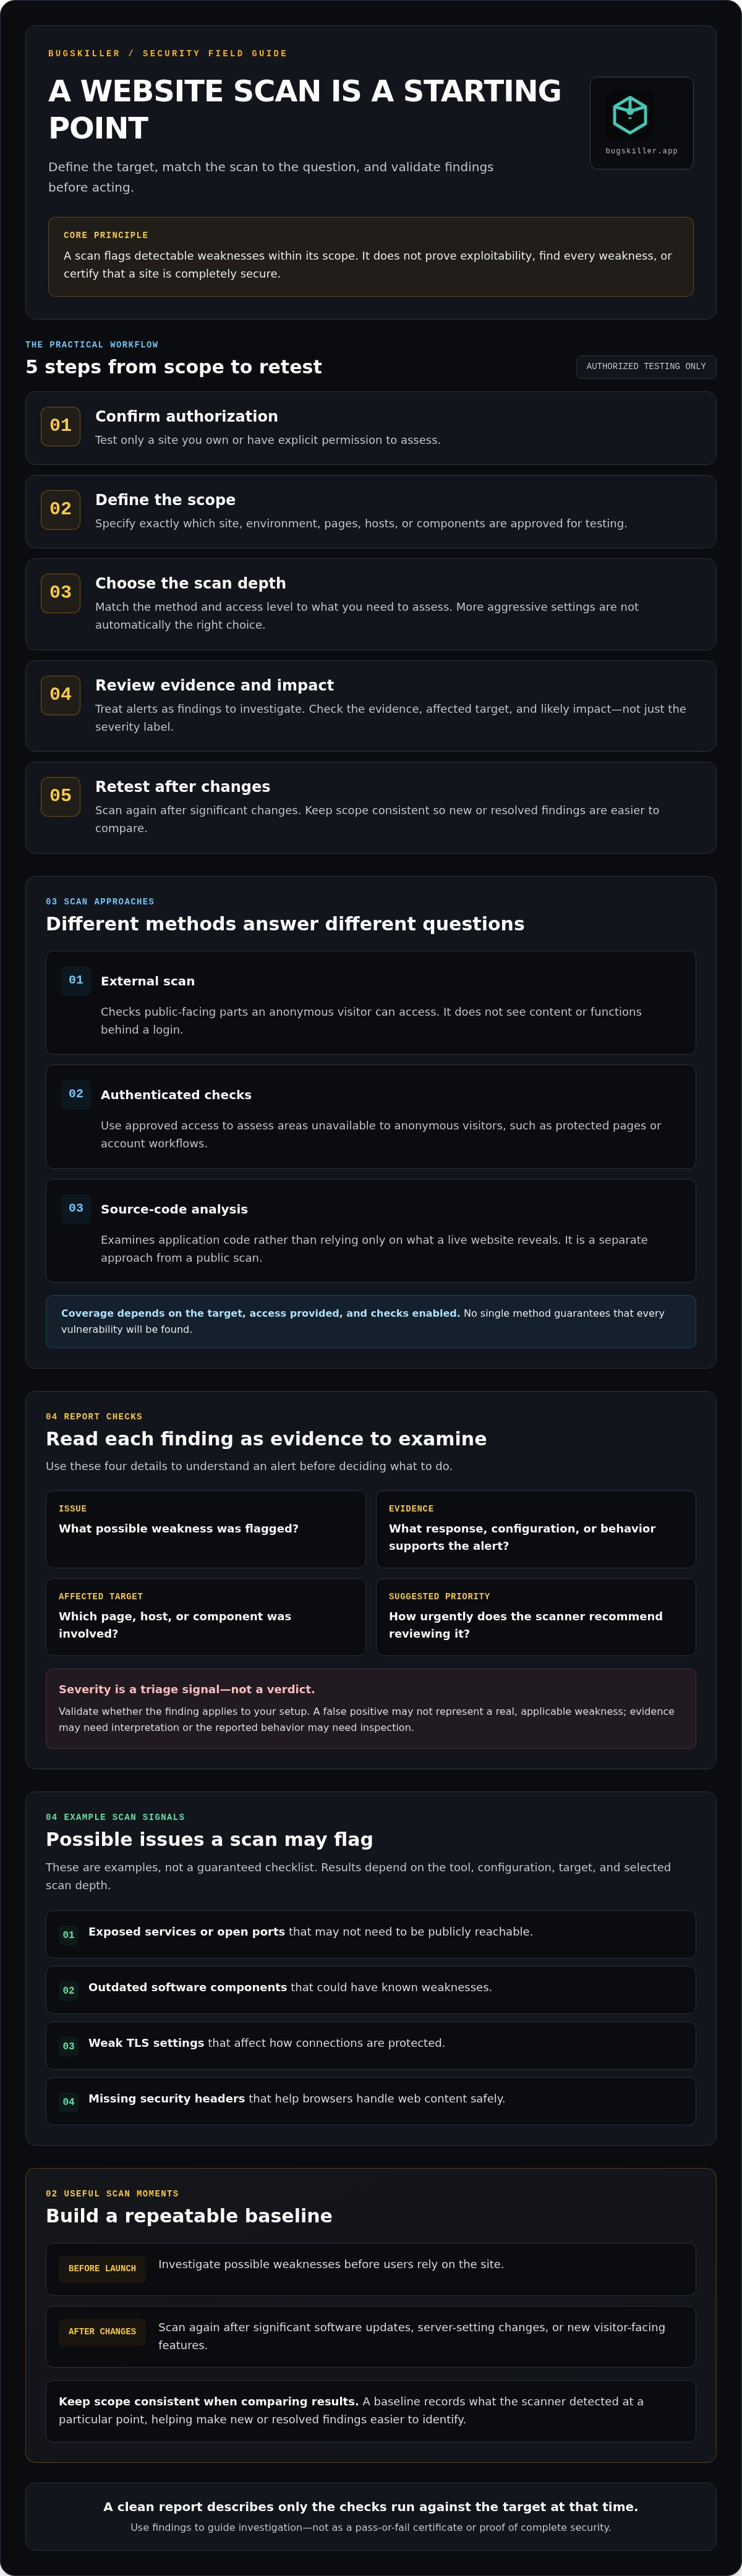
How to scan your website safely: a practical five-step process
Keep the process controlled from setup through retesting. Scan only websites or environments you own or have explicit permission to test. If available, start with a staging environment that reflects the live site. The effect of a live-site scan depends on its configuration and checks, so define limits before you begin.
- Confirm authorization. Get clear permission for every domain and environment included. Don’t assume a linked service or vendor system is yours to test.
- Define the scope. List the approved domains and public-facing areas. Exclude third-party systems unless their owners have authorized testing.
- Choose scan depth. Select checks that fit your target and goal. A broader or deeper scan may assess more, but it still needs to stay within the agreed scope.
- Review the evidence. Check each finding against the affected URL, observed behavior, and your site’s actual setup. Record what’s confirmed, uncertain, or not applicable.
- Address and retest. Assign confirmed issues an owner and priority. After changes, rerun relevant checks and compare the new evidence with the original report.
How should you prepare a website for a scan?
Write a short scope note before you start. Include the domains and public-facing areas in scope, recent site changes, and relevant components that may help explain results. For example, note a recently updated plugin or a changed login flow. This context can make findings easier to investigate. Keep third-party systems out unless you have permission from their owners.
If a staging environment is available, use it to assess changes before they reach production. For a live-site scan, understand which checks are enabled and how they’re configured. Don’t expand the target mid-scan. Clear boundaries help prevent testing beyond your authorization.
How do you close the loop after reviewing findings?
Don’t stop at the report. Assign every confirmed issue an owner, set a practical priority, and record the decision. Retest after changes, then compare the evidence to see whether the condition remains. Keep a concise log of findings, decisions, fixes, and unresolved risks to support your launch review.
Use the same disciplined approach in your testing website security before deployment workflow: define the target, run suitable checks, and verify what changed. To scan website for vulnerabilities within a defined scope, start a website security scan and review the findings before deciding on next steps.
Scan your website with BUGSKILLER and turn findings into next steps
A website scan is most useful when it gives you a clear next action. BUGSKILLER scans public websites at a selected depth and presents findings in plain language. Use it to surface potential issues before deployment, then review the evidence and decide what needs further investigation. A report can guide your review, but it doesn’t fix vulnerabilities automatically or guarantee that a website is secure.
What happens when you start a BUGSKILLER website scan?
Start with a public website you own or are authorized to test. Run the free target check, then review the recommended scan plan for that target. Choose a scan depth that fits your assessment and keep the target within your authorized scope.
After the scan, review the plain-language findings and report, delivered within minutes. Treat each result as a prompt to investigate: identify the affected part of the site, check the evidence behind the alert, and determine whether the issue applies to your setup. A potential finding isn’t automatically a confirmed vulnerability, so validate it before deciding how to respond.
How can you use the scan report before launch?
Turn the report into a short, practical work list. Start with findings that appear credible and could affect exposed or sensitive functionality. Review the evidence and priority, then group related alerts that may point to the same underlying issue. This helps your development team focus on likely causes instead of treating every alert as a separate task.
After changes are made, rerun relevant checks and compare the results. Confirm whether the original evidence has changed, and track anything that still needs review. A scan provides a snapshot of the checks performed against the target. It can guide launch decisions, but it can’t establish that every weakness has been found or that the site is completely secure.
If you’re ready to scan an authorized public website, start with a free target check, review the recommended plan, and select the depth that fits your next step.
Make your next scan a clear step toward launch
A safe website scan starts with authorization and a defined scope. Choose scan depth for your target, then examine the evidence behind each finding instead of treating severity labels as final verdicts. Validate credible issues, prioritize those that could affect users or sensitive functionality, and retest after changes.
That’s the practical way to scan website for vulnerabilities: use the results to guide decisions, not as proof that every risk is gone. BUGSKILLER’s free target check helps you get started. Review the recommended plan, select a scan depth, and use the plain-language findings and reports, delivered within minutes, to decide what needs attention. The scan won’t fix issues automatically, but it can give you a clearer starting point before launch.
Run a free target check and see what your website scan can uncover. Review the findings and decide what to investigate next. A defined scope and clear follow-up plan can help you move toward launch with greater confidence.
Frequently Asked Questions
How do I scan my website for vulnerabilities?
To scan website for vulnerabilities, start with a site you own or have permission to test, then define the domains and pages in scope. Choose a scan depth suited to your goal, run the checks, and review the evidence behind each result. With BUGSKILLER, start with a free target check, review the recommended scan plan, and select a depth for your public website.
Is it safe to scan my own website?
Scanning your own website is appropriate when you control the target and keep the scan within a defined scope. For added control, use a staging environment when available, especially before running deeper checks. If you scan a live site, understand which checks are configured and exclude third-party services unless you have permission to test them. Review results carefully, since a scan identifies potential issues rather than confirming every risk.
Can a website vulnerability scan damage my site?
A scan sends requests to your site, so its effect depends on the tool, configuration, and selected scan depth. Some checks may create load or interact with site functions. Don’t assume every scan behaves the same way. Use staging if possible, keep the scan scoped, and consider how live-site behavior could be affected before running it. Don’t test systems you don’t own or have permission to assess.
What vulnerabilities can a website scanner find?
Depending on its checks and access, a website scanner may flag exposed services, outdated components, weak TLS settings, or missing security headers. Some checks examine only publicly visible behavior, while authenticated scans may reach protected areas. Coverage varies by scanner, target, and configuration. A report won’t necessarily include source-code weaknesses or every issue on the site, so treat results as findings to investigate, not a complete inventory.
How long does it take to scan a website for vulnerabilities?
Scan time depends on the target, selected depth, and checks performed. A focused scan may finish faster than one that assesses a broader target or uses more extensive checks. BUGSKILLER provides plain-language findings and reports within minutes. That describes the reporting time, not a promise that every issue can be validated or addressed within the same period. Review the results after the scan completes.
What should I do after a website vulnerability scan?
Review each finding’s evidence, affected part of the site, and suggested priority. Confirm whether the reported condition applies to your configuration, then assign credible issues an owner and practical priority. Group related alerts if they point to the same underlying cause. After changes are made, rerun relevant checks and compare the new evidence with the original report.
Does a clean website scan mean my site is secure?
No. A clean report means the configured checks didn’t identify findings on the target they assessed. It doesn’t prove that every page, access level, or type of weakness was covered, or that the site has no vulnerabilities. Use the report as one input to your launch review. Keep the scan scope and limitations in mind, and reassess after major changes to the public-facing site.
