

What if the security check that makes your site feel ready only catches the easiest risks? If you’re asking how to test website security before launch, use a layered process rather than relying on one scan. Automated tools can quickly flag common, detectable weaknesses, but they can’t confirm that every account, data flow, and site feature is secure.
It can be hard to know which checks to run first, especially when a hidden flaw could put user data or accounts at risk. A scan is a useful starting point, but its results matter only when you understand what they mean, address the right issues, and check that the fixes worked.
This guide walks you through safe, authorized checks in a practical order. You’ll define your scope, inspect key settings and user flows, run an automated website scan, prioritize findings, and retest changes before launch. The goal is a clearer view of your site’s security, not a false promise that one test can catch everything.
Key Takeaways
- Test only websites and systems you own or have permission to assess, and define the target before you begin.
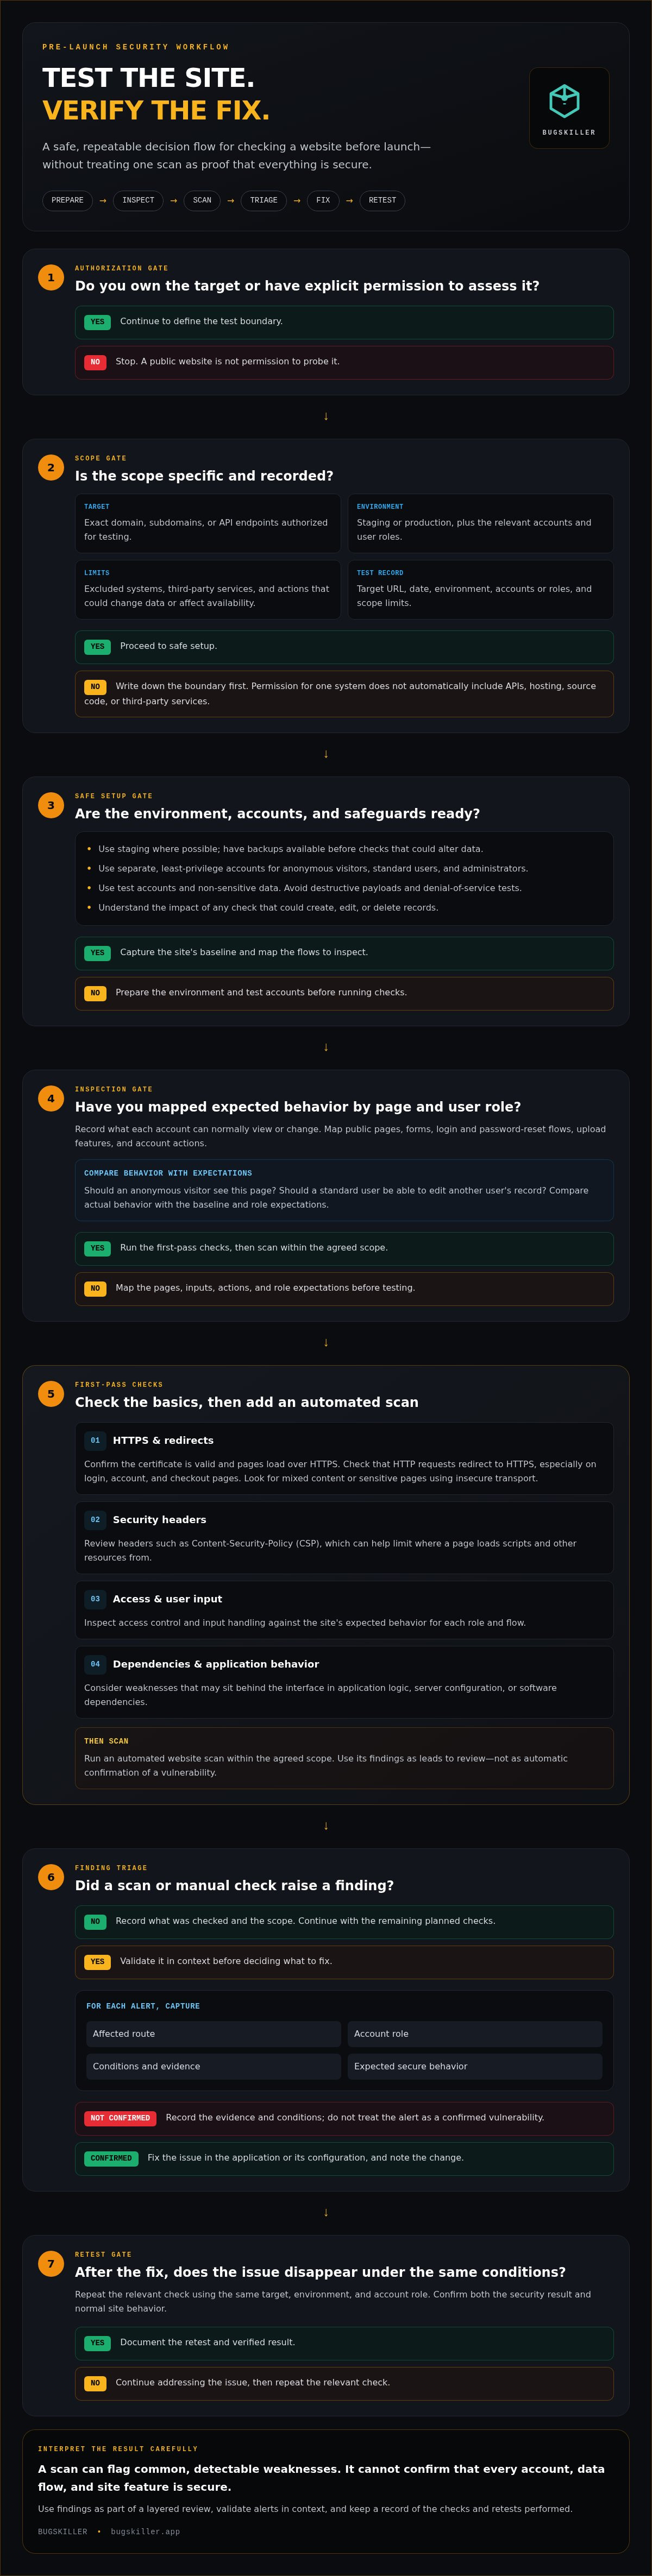
- Use a clear workflow for how to test website security: prepare, inspect, scan, triage, fix, and retest.
- Start with practical checks such as HTTPS, certificate validity, redirects, and security headers.
- Use automated scans to flag potential weaknesses, then review findings in context instead of treating every alert as confirmed.
- Prioritize issues by severity, exposure, affected data, and reproducibility, then document evidence and verify each fix.
How to Test Website Security: Define Your Scope Before You Start
Website security testing means checking a site for weaknesses before or after release. Start with a clear boundary: identify what you own, what you’re authorized to assess, and what the checks should cover. Test only your own systems or targets you have explicit permission to assess. A public website isn’t an invitation to probe it.
Separate the website from the systems around it. A public domain, its APIs, source code, hosting environment, and third-party services may have different owners and access rules. Permission to check one doesn’t automatically include the others. For a broader overview of the topic, see Web application security.
What does a website security test cover?
A browser reveals visible behavior, such as login pages, forms, and redirects. Other weaknesses may sit behind the interface in server configuration, application logic, or software dependencies. Common areas to consider include transport security, access control, input handling, and dependencies. What gets checked depends on the test method and selected scan depth. A checklist or scan can point to possible issues, but neither proves that a website is completely secure.
How do you test safely and with permission?
Write down the scope before running checks. Keep it specific and easy to verify:
- Target: List the exact domain, subdomains, or API endpoints you’re authorized to test.
- Environment: Identify whether you’re testing staging or production, and record the relevant accounts and user roles.
- Limits: Note excluded systems, third-party services, and actions that could change data or affect availability.
Use staging where possible, and make sure backups are available before checks that could alter data. Use test accounts and test data rather than real user records. Avoid destructive payloads and denial-of-service tests. If a check might create, edit, or delete records, understand its impact and keep it within the agreed scope.
Clear boundaries make results easier to interpret and reduce the risk of disrupting a live service. They also keep a website scan focused on the intended target rather than unrelated infrastructure. Once the scope is set, record the target, environment, accounts, and exclusions so every check stays authorized and repeatable.
How to Test Website Security Step by Step
A repeatable process makes website checks easier to run and their results easier to act on. Keep a test record with the target URL, date, environment, accounts or user roles used, and any scope limits. Capture baseline behavior before testing: note what each account can normally view or change, and how key pages and actions should respond. This gives you a clear comparison if a check reveals something unexpected.
Prepare the site and test accounts
Confirm the target and authorization, then use staging when available. Back up data before tests that could change it. Create separate, least-privilege accounts for anonymous visitors, standard users, and administrators. Use test accounts and non-sensitive data wherever authentication is required. This lets you check access boundaries without exposing real user information or giving test accounts more access than they need.
Map pages, inputs, and user actions
List the site’s public pages, forms, login and password-reset flows, upload features, and account actions. For each, write down the expected behavior by role. For example, should an anonymous visitor see a page? Should a standard user be able to edit another user’s record? Use these expectations to guide checks and spot access that differs from the intended design.
Follow this sequence:
- Prepare: Confirm the target, environment, accounts, and test record.
- Inspect: Walk through mapped pages and actions. Compare actual behavior with your baseline and role expectations.
- Scan: Run an automated website scan within the agreed scope. A tool such as the BUGSKILLER Website Security Scan can add automated findings to your review. The OWASP Web Security Testing Guide (WSTG) offers a broader reference for structuring website tests.
- Triage findings: Review each alert. Record the affected route, account role, conditions, evidence, and expected secure behavior. Treat a scan result as something to validate, not automatic confirmation of a vulnerability.
- Fix: Address confirmed issues in the application or its configuration. Note the change so you can assess its effect.
- Retest: Repeat the relevant check under the same conditions. Confirm the issue no longer appears and normal site behavior still works.
Keep the record consistent across each run. If the target, environment, or account role changes, note it. That context helps distinguish a real security improvement from a difference in test conditions, and gives you a practical basis for deciding whether the site is ready for the next review.
Which Website Security Checks Should You Run First?
Start with checks that protect every visitor, then move to account access and user input. This creates a practical first pass when deciding how to test website security, without treating any single check as proof that the site is safe.
- HTTPS and redirects: Confirm the certificate is valid and pages load over HTTPS. Check that HTTP requests redirect to HTTPS, especially on login, account, and checkout pages. Look for mixed content or sensitive pages that still use insecure transport.
- Security headers: Review headers such as Content-Security-Policy (CSP), which can help limit where a page loads scripts and other resources from. A header is one layer of defense, not a fix for every attack or a substitute for secure application logic. Mozilla Observatory can help you review a site’s web-facing security configuration.
- Authentication and authorization: Check private pages while signed out, then compare what standard-user and administrator accounts can access. Each user should be able to view or perform only the actions allowed for that role.
- Inputs and dependencies: Review forms, search fields, and upload features for unexpected behavior. Use maintained, reputable tools to check software dependencies for known vulnerabilities, and compare results with the versions your site actually uses.
How can you check access control and session behavior?
Use test accounts only. Confirm that private pages require sign-in and that sensitive actions, such as changing account details or managing users, require the correct role. Log out and revisit a protected page, then check what happens after a session expires. Protected content should not remain available after logout. Don’t try to access another person’s data, even if a URL or interface makes it appear reachable.
How can you inspect common web vulnerabilities?
SQL injection happens when unsafe input affects a database query. Cross-site scripting (XSS) occurs when untrusted content runs as code in a visitor’s browser. Test these risks only in an authorized environment, using safe checks that won’t alter records or expose real data. Also review upload restrictions, error messages, and input validation. Errors shouldn’t disclose sensitive details such as internal paths or configuration information.
Use OWASP guidance to structure your review, but don’t treat a checklist as complete coverage. Checks vary by application, test method, and selected scan depth. Review each result in context, confirm whether it applies to your site, and record anything that needs further investigation.
Automated Website Scans vs. Manual Checks: What Each Can Find
Automated scans and manual checks answer different questions. A scan can quickly and repeatedly flag detectable patterns across a defined public target. A manual review adds context: does a feature behave securely for each user role, and could someone reach or misuse a particular action? When deciding how to test website security, use both as complementary inputs, not competing alternatives.
- Speed: Automated scans can run checks quickly. Manual reviews take more time because someone must follow workflows and interpret behavior.
- Repeatability: Scans make it easier to rerun similar checks after a change. Manual checks can also be repeated, but the reviewer needs to follow the same steps and conditions.
- Context: Scanners match detectable patterns. Manual review can account for business rules, user roles, and the purpose of a feature.
- Blind spots: A scan may miss complex logic flaws or issues that require a specific user journey. A manual review may miss broad technical patterns or checks that are easier to run consistently with a tool.
When is an automated website security scan useful?
Use a scan to look for common, detectable issues across an authorized public target. Set the scope and choose a scan depth that fits the site and your testing needs. Then review the report: an alert is a lead to investigate, not proof that an issue can be exploited. BUGSKILLER scans public websites and presents findings in plain language to support your review. For help choosing an approach, read the website security scan guide.
What can manual review catch that a scan may miss?
Manual review can follow unusual user flows and test business rules that a scanner may not understand. For example, check whether a standard user can perform an action intended only for an administrator. Review whether a flagged route is reachable, what data it exposes, and whether the behavior creates a real risk in your site’s context. A scan and a manual review are different assessment methods, with different strengths and limitations.
Neither method is complete on its own. Use scan results to guide investigation, and use manual checks to test how the application behaves in context. A scan report is one input to security decisions, not proof that a site is safe or a compliance certification. To add an automated check to your review, run a website security scan.
How to Prioritize Findings, Fix Issues, and Retest Before Launch
Finding a weakness is only the start. To make how to test website security useful, turn each result into a tracked decision: confirm what’s happening, assess the impact, assign the next action, and retest after a change. Don’t treat every alert as equally urgent, and don’t let unresolved findings disappear from view.
How should you triage website security findings?
First, separate confirmed issues from informational notes and possible false positives. Then weigh each confirmed finding by severity, exposure, affected data, and reproducibility. An issue that exposes sensitive information or breaks access controls deserves prompt attention, as does a remotely exploitable weakness. A lower-impact issue on a rarely used feature may rank differently, but still needs a documented decision.
Keep enough evidence for someone to understand and reproduce the finding safely. Record:
- Location: The affected route, feature, or component.
- Conditions: The account role, input, and steps that triggered the behavior.
- Evidence: The observed result, without storing unnecessary sensitive data.
- Expected behavior: What the site should allow or block.
- Next action: The owner, planned fix, and target for review.
Fix high-impact issues before launch where possible. Track remaining work with a clear owner and status. If a finding is accepted as a risk rather than fixed, record why, who made that decision, and what follow-up is needed. A silent dismissal isn’t a risk decision.
How do you retest and decide what comes next?
After a change, repeat the relevant check under the same conditions, using the same route and account role. Confirm the original issue is corrected, then check that normal site behavior still works. For example, verify that a restricted action is blocked for a standard user while remaining available to the intended role. Record the retest date, result, and any remaining work.
Keep a dated history of findings, fixes, and retests. This gives your launch decision a clear basis and helps you catch regressions when later changes affect the same feature. A clean result reduces uncertainty, but no scan or checklist can guarantee zero risk. Review what remains, understand its impact, and make an informed decision before release.
Once you’ve defined an authorized target, start with a free target check to get a recommended scan plan.
Make Your Prelaunch Security Check Count
A stronger launch decision starts with a clear scope and a repeatable process. You can test website security by combining hands-on checks with an automated scan, then reviewing findings in context instead of treating every alert as confirmed.
Prioritize issues that expose sensitive data, weaken access controls, or create serious risk. Track the fixes, repeat relevant checks, and keep a record of what remains. Testing can reduce uncertainty, but no single scan or checklist can guarantee zero risk.
Ready to add a scan to your review? Run a free target check with BUGSKILLER to get a recommended scan plan. Choose a scan depth for your target and use plain-language findings to understand what needs attention. Start with a clearer view of your site before launch.
Frequently Asked Questions
How can I test my website security for free?
Start with safe manual checks, then use an automated scan to look for potential weaknesses. Check HTTPS, redirects, security headers, and whether private pages require sign-in. Use only systems you own or have permission to assess. BUGSKILLER offers a free initial target check with a recommended scan plan. To test website security effectively, review results and verify fixes rather than relying on a scan alone.
Can I scan my website without permission?
Only scan websites and systems you own or have explicit authorization to assess. A site being publicly accessible doesn’t grant permission to probe it. Define the target and boundaries first, including domains, APIs, environments, and excluded systems. If a third party owns part of the infrastructure, don’t include it unless your authorization covers it. Keep checks within scope and avoid actions that could disrupt services or alter data.
What should I check first when testing website security?
Begin with HTTPS, certificate validity, and redirects from HTTP to HTTPS, especially on login and other sensitive pages. Then review security headers and check that private pages require authentication. Compare access for test accounts with different roles. After these baseline checks, review forms, uploads, and dependencies for potential weaknesses. Keep the target and environment in scope, and use test accounts and non-sensitive data for authenticated checks.
Are automated website security scans enough before launch?
No. Automated scans can quickly flag common, detectable patterns, but they may miss business logic flaws, unusual user flows, or permission issues that require context. Review each finding to determine whether it applies and can be reproduced. Add manual checks of key actions and account roles, then fix confirmed issues and retest. A scan is one useful input to a launch decision, not proof that a site is completely secure.
How often should I test website security?
Test before launch, after significant changes to the site, and when updates affect authentication, access controls, forms, dependencies, or hosting configuration. Repeat relevant checks after fixing a finding to confirm the change worked and didn’t disrupt normal behavior. For a live site, set a recurring review schedule that reflects how often it changes and the sensitivity of its data. Keep dated records so you can track results over time.
What happens if a website security scan finds a vulnerability?
Review the alert and confirm whether it’s reproducible under the stated conditions. Record the affected route, evidence, and expected secure behavior, then prioritize the issue based on severity, exposure, and affected data. Assign an owner to address confirmed issues and document any accepted risks. Retest after changes using the same conditions. A scan report helps guide investigation, but it doesn’t fix vulnerabilities or determine the full security of your site.


